Has this ever happened to you? You're right in the middle of a creative project on your Mac, and you need to pull up documentation. Maybe you're in Photoshop and you want to look up something about a graphic plug-in you purchased. Or you're in Logic and you can't remember the function of a knob in a third-party virtual instrument.
The application didn't come with printed manuals, or if it did, you can't find them. The application's built-in help doesn't answer your question, so you go searching for the manual on your hard disk. You can't remember who makes the plug-in/instrument, so you can't figure out where the documentation is stored on your hard disk. You try using Spotlight, but you don't know what the manual is called. Is it "Getting Started"? "Operating Manual"? If you try searching for the product name, you get hundreds of references, but none are for the manual you want. Is the manual in a directory hidden from Spotlight? Is it buried in an application bundle? By the time you find the manual, you've forgotten what it is you were looking for.
This happened to me all the time, and I was determined to find a solution. I tried creating aliases to my documentation and placing them in a special directory. I tried color-coding the documentation files and creating smart folders that grabbed all files of a specific color. I tried many other ideas, but they were all too hard to use, too slow, or took too long to set up and maintain.
Then, I came up with a great solution that does exactly what I want. Read on to find out more...
I can quickly pull up a manual for any product with online documentation. I can pull up tutorial videos, Web links, or other related files. I can easily search within the documentation. I can access all my documentation from any computer on my network or someone else's. I can even use my iPhone or iPad!
My approach uses the free program Evernote. If you're not familiar with Evernote, you should be. It's an all-purpose notebook for storing Web pages, documents, graphics, and more. You can have multiple virtual "notebooks" to store your notes, and you can easily search for information buried in your notes. Notes can be tagged and location stamped. You can retrieve your notes from any Web browser, from your Mac or PC, and from portable devices like iPhones, iPads, and Android phones. The premium version, which is available for a few dollars a month, gives you much more storage and other features, such as the ability to search within PDF files. You can download Evernote at Evernote.
For our documentation organizer, we are going to create a Service that allows us to select one or more files and quickly add them to Evernote. Services is a built-in feature of the Mac operating system that allows you to automate repetitive tasks. (For an introduction to Services, check out Rounik Sethi's article on creating Services here. For more detailed info on Creating Services and Automator check out this Advanced OSX 201 tutorial here.
Step 1: Download and Install Evernote
If you don't own Evernote already, go to Evernote.com and download it. You can find a video introduction to Evernote on the site, as well as other useful information. As you get familiar with Evernote, you'll find yourself storing all kinds of information in the application -- travel plans, meeting notes, recipes, etc. At some point, you may need to upgrade to the Premium plan for additional storage, but you can do that at any time.
Once you have installed Evernote, open it up and look around. Try creating a note by clicking the New Note icon or pressing Command-N. Add tags by clicking the "Click to add tag" icon. Tags will show up in the left hand column, making it easy to see all related notes. When you install Evernote, you can also add an icon to your Safari or Firefox Menu Bar that allows you to quickly add Web pages to Evernote. You'll also notice the Evernote elephant up on the top right of your screen (near the Spotlight magnifying glass). The elephant provides another quick way of adding or searching for a note.
Step 2: Create the Apple Service
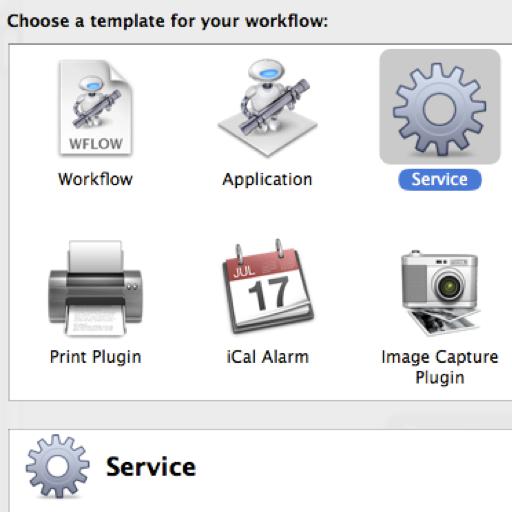
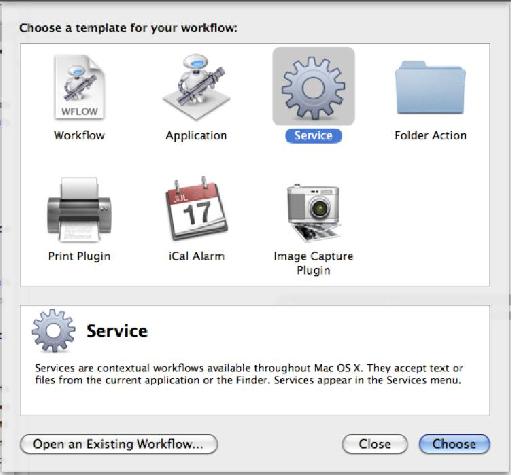
Now, we need to create our Apple Service. Start by opening up Automator. Find it in your Applications folder or search for it using Spotlight. You will be prompted with the following dialog box:
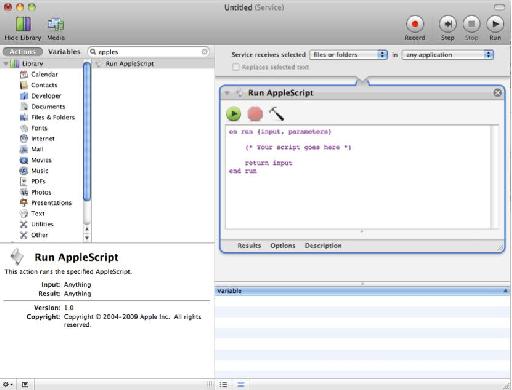
Select the Service icon. We want our Service to be active when ever a file or folder is selected, so change the first drop down to read "files or folders".
Next, search for the Automator action "Run AppleScript" by using the search box in the left hand column. Once you've found it, drag it into the main window:
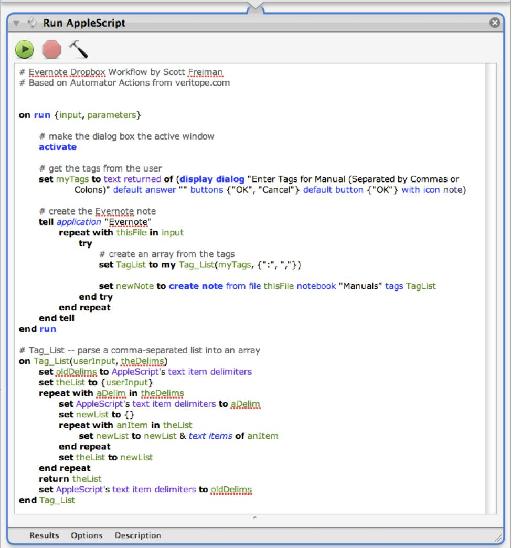
Our Service is going to run an AppleScript that creates Evernote notes in a notebook called "Manuals". It first prompts for tags to assign to the documentation files and then creates the note(s) using those tags.
Type in the script as shown below. (If you are interested in how the script works, you can read the comments. They all begin with a "#" sign.)
Save the Service by choosing "Save" from the File menu. Call it "Evernote Dropbox" (or whatever you want). Quit the Automator. You're done!
If you would rather not type in the script, just download the complete Automator action here. Place it in the /Library/Services directory under your user account.
Step 3: Try It Out
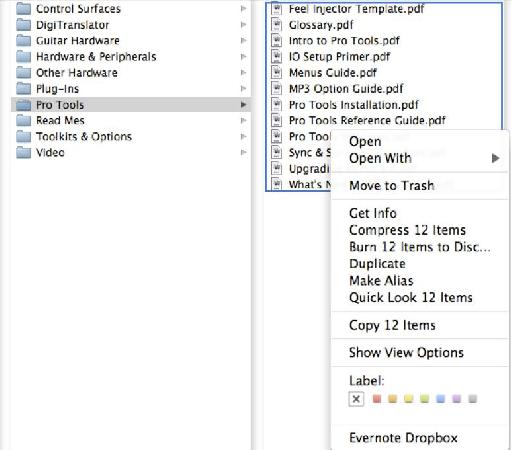
Let's find a manual to add to Evernote. For example, I'm going to add my Pro Tools manuals. I have to first find the manuals (they are in Applications/Digidesign/Documentation/Pro Tools/), but this will be the last time I ever have to do this once I use my new Documentation Organizer!
Highlight all the files you wish to add to the Documentation Organizer. Right-click or CTRL-click the files and select the Service you just created from the bottom of the contextal menu:
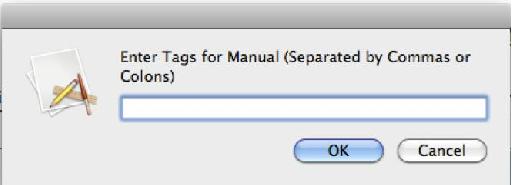
Our Automator action begins to run, and a dialog box appears:
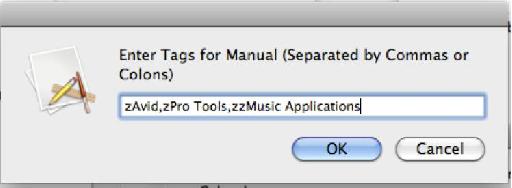
The method I use for tagging my documentation is to add three tags, one for the company, one for the product, and one for the "class" of product. I precede the tags with the letter "z" so they show up at the bottom of my tag list in Evernote and don't interfere with my other tags. This makes it easy to narrow down searches to specific products, companies, or classes of products.
You are free to come up with your own scheme for tagging your documentation. The important thing is that you separate multiple tags with a comma or colon.
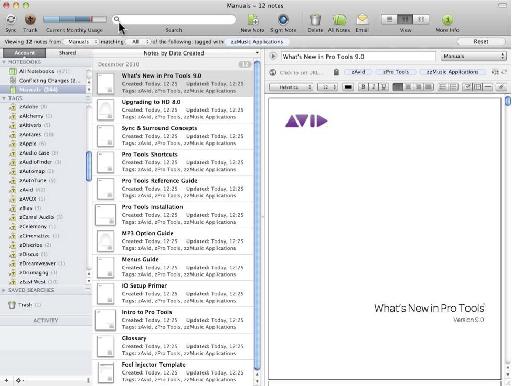
Click "OK" to create the notes. In Evernote, you will see the documentation you just added:
In this example, you can see some of the tags that I have set up for my documentation in the left hand column. In the center, are all the Pro Tools manuals I just added. I can easily find the manual I'm looking for, or I can search through all my manuals. If I would rather use Preview to read the manual, I can right click on the document and select "Open With...->Preview".
If I want to find all my documentation that discusses automation, I can just type "automation" in the search box. But, if I want to narrow it down to just my Pro Tools documentation, I need to use my tags. I can either select the tag from the left hand column or include the phrase "tag: {tag name}" in my search. For example, if I wanted to search for all my Pro Tools documents that mentioned automation, I would use the search phrase "automation tag:zPro Tools".
Step 4: Add a Keyboard Shortcut
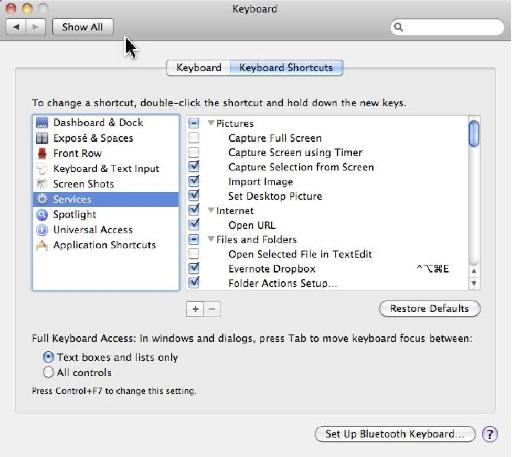
Using the context menu to create a note works fine, but I prefer to use a keyboard shortcut. It's easy to add one for a Service. Go to System Preferences (under the Apple menu) and select Keyboard. Select the Keyboard Shortcuts tab and choose Services in the left hand column. Find your Evernote Dropbox service and double-click in the right hand column to add a shortcut. You'll notice that I assigned Command-Ctrl-Option-E for mine. Now, I simply have to select manuals that I want to add and press the keyboard shortcut.
Finding Product Documentation
Now that we have a great way for organizing our documentation, we just have to find all our manuals, select them, press our keyboard shortcut (or use the context menu), and assign tags to create our documentation database. Sometimes, it can be a little tricky to find the manuals you are looking for. Here are a couple of places you can look:
- In the application's directory. You can usually find the documentation somewhere under the directory tree for the application. In the case of Pro Tools, there are scores of manuals divided into sub-directories all under "Digidesign/Documentation". Of course, you only need to add the manuals that you want.
- In the "Library/Application Support" and "Library/Documentation" directories. For example, the Getting Started guides for Apple's iLife applications are found in Library/Documentation/Applications directory, and the documentation for all BIAS products is in the Library/Documentation/BIAS directory.
- In the application package. This takes a little more digging since you have to open up the contents of the application. Sibelius stores its documentation this way. Select the Sibelius application and choose Show Package Contents from the context menu. Then, look in "Contents/Resources/en.lproj/Sibelius Help". There, you will find the file "Sibelius Handbook.pdf" along with several other manuals.
- On the Web. Some manufacturers host their documentation or other useful information on their Web sites. For example, there is no PDF manual installed on your disk as part of the Logic 9 installation, but it is available online. You can use your Evernote Web clipper to easily add any of these documents to your Documentation Organizer. Just make sure to tag them in the same manner as the documentation you added from your disk.
Summary
My Documentation Organizer has freed me from all the time I used to spend searching for documentation. It's so easy to locate a specific manual and search its contents. I can even use my iPad to browse documentation without having to bring up Evernote on my main computer when I'm working. What's more is that I can access all my documentation when I'm working in another studio. -- an enormous help and a great way to impress your clients!
I hope you'll find the Documentation Organizer as useful as I do. Of course, if you have ideas about how to make it better, please add them to the comments below.

